At ITP we have to document everything, so I have been using the blog itself as my medium to hash out ideas. From beginning to end of this post, you will see how my ideas evolved.
Step 1: Research
I needed to know exactly how a flashlight works or I wouldn’t have a chance of making one. In addition, a few ideas design wise: I kinda liked the portability of my USB drive and its pinwheel cover effect. Maybe I’d model it after real fire emitting tools ex: lighter, match .... after some research, could I put the electronic components in the actual lighter body??
A quick google search led me to this diagram which explains how a flashlight works. It boils down to a simple circuit: A light bulb of some kind, batteries, wire, and a switch/button (can throw in a resistor in there too if we want to control voltage).


How to proceed? I'm thought I should try making the circuit first and then figure out what to put it into.
Step 2: Make a Circuit
I made a simple circuit with 2 AA batteries taped together, a white LED, and copper wire. My finger acts as the switch, turning the light on when pressure is applied.

For the second round: I added a switch (small Arduino button) to control when the light goes on or off. In the future, I’d like to look into switches that hold this position, so that the user does not have to constantly hold the button for light.

Step Three: Find a shell
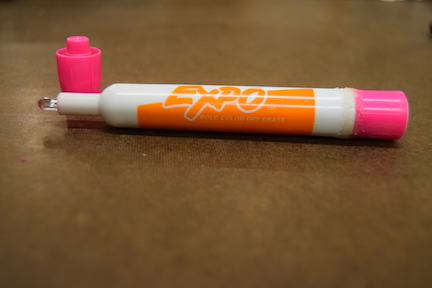
After having the circuitry figured out, the next step is to encase it into some sort of shell. Although I felt pretty married to the idea of putting it in a lighter, using two batteries forced me to abandon that idea. I would need something long and slender instead. That’s when I thought a highlighter or Expo marker would work well. It’s the right width to hold batteries and the LED could fit where the felt tip would be.
But what would creation be without the unexpected. After removing the insides of the marker, the batters fit perfectly in diameter but were too long and stuck out at the end. Determined to use the marker as the shell, my plan is to extend it out at the bottom. I’ll use another marker shell to increase the length.
My biggest issue so far was figuring out how to include the switch. Ideally the switch would be encased as well with only the button exposed for the user. However, the batteries fit too snugly that there is no room for the switch. I started by drilling a hole, until realizing the whole square base of the button will have to come out from the shell. Using an icepick and my gas stove, I heated the icepick to melt the plastic, creating more of a square hole for the button.

I loosely rigged it all together, so that I know all parts will work and roughly where I want them:

Sketch of the final design aesthetic:

Step 4: Assemble
Using the band saw in the shop, I cut the bottom portion of another marker to extend the container. This proved to be my easiest task, because the true assemblage took many tries. Since I’ve only tried soldering a few times before, I definitely wasn’t skilled enough to complete the detailed work I was looking for. In addition, wires kept breaking. I thought maybe assembling it outside of the container first and then putting it inside would work, but that was also a flop. Eventually I got it light using copper tape and funny curls to make electric connections.


Final thoughts:
This was a seemingly simple task that proud to be very challenging for me. My biggest pitfall was just fighting my perfectionism. It doesn’t look as nice as I want it to look, and I know there are many ways to improve the actual electronic mechanisms. I understand very generally how the circuit is working, but would love to delve further. Overall, I’m proud that it lights up and resembles pretty closely to my design. Now…off to pray to the ITP and Circuitry Gods that it’ll work for class tomorrow!
Resources:
https://flashlightfinder.com/how-does-a-flashlight-produce-light/