This project demanded a interconnectedness between the physical and the virtual. It was a complicated balance and a long process. Below I try to breakdown the steps, the division of our labors, and the process of iteration for each component of Deep Dive.
CREATING THE INTERACTIVE FLOOR:
After the first play test we began construction of better plate switches. We used two layers to keep it flat. Our goal was to make the switches barely noticeable under the feet so users would have “stumble across”, so to speak, the game controls.
Version 1: Our first iteration of the floor pad used chip board (a non-corrugated cardboard) of different thickness. We used a thin chip board to lay on the floor underneath the mat. In certain areas we taped a layer of tin foil, stacked a stiffer chip board frame over it, and then added a tin foil on the underside of the mat.
Result: The tinfoil sections kept touching creating constant signal. We needed to create a thicker separation between the pad and floor. Luckily, we purposefully used tape early on to account for future adjustments.

Laser cut design of plate switches

Laser cut chip board pieces. The “Frame” shape was key.
Version 2: For our next playtest we glued all components down, and soldered our connections to a perf board.
Result: Eventually the tinfoil began to tear and it was quite cumbersome having everything wired together with two separate layers that had to be aligned exactly.

Breadboard —>

Solder —>

Perf Board.
Version 3: For our final version, which was for the winter show, we knew we needed to seriously amp up the robustness. We purchases thin aluminum sheet metal because it is conductive, and we could easily cut it to size. We maintained the original tinfoil on chip board layer, glued the chip board frames on top, and then glued the sheet metal on top of that. This allowed us to have the mat completely separated from switches and we could even alter their position under the mat if we wanted.
Result: We did have one issue where hot gluing connections to the sheet metal actually ruined its connectivity, but using tape was a quick fix. In the future, it should be soldered. Overall, it held up really well during the two-day show.

HOW DO YOU LIKE THEM BUTTONS?
After all our playtests, we realized getting people to touch the wall was really difficult. Do we have to make an obvious button? Are we trying to hide it so it still looks like a wall/the projection over it? We had a lot of questions about how to make this button effective. By a sort of happy accident, we created small plate switches that users had to end up holding during our tests, so we ultimately decided that it actually worked quite well. Players never questioned holding a device (even if it was tethered), because it’s quite natural in gaming. Cara came up with the idea to put it on “scuba goggles”. The goggles are not functional, merely an enclosure for the button, but it made it more fun, and fit perfectly into our story.

Floor mats are fun.

Button on the goggles turns on a light, I swear.
WORLD BUILDING IN UNITY:
Design of the world was conceptually thought out by all of us and then executed by Dylan. We knew we wanted a cave underwater with a tunnel to the surface. We had some iterations, in terms of figuring out how best to create the world and how it would be navigated. At first we thought perhaps each hidden object was located in a different scene, but ultimately settled on keeping the same environment and shifting view within it to find objects. A change in environment happens when you start on the surface and when you go through the tunnel at the end back to the surface (overall image of the model was developed in version2).
Version 1: As shown in our first playtest, the world was just the basic Unity demo with floating objects. For the true version 1, Dylan began to play around with water prefabs and the aesthetics of above and below the surface.
Version 2: The model of the world was created in Maya with a rock texture added. Using effects like fog created an underwater feel. For our initial runs, some of the objects, like the light, were only place holders.

Yellow sphere place holder for a light source. Notice the fog element that make the cave especially dark and difficult to orient.
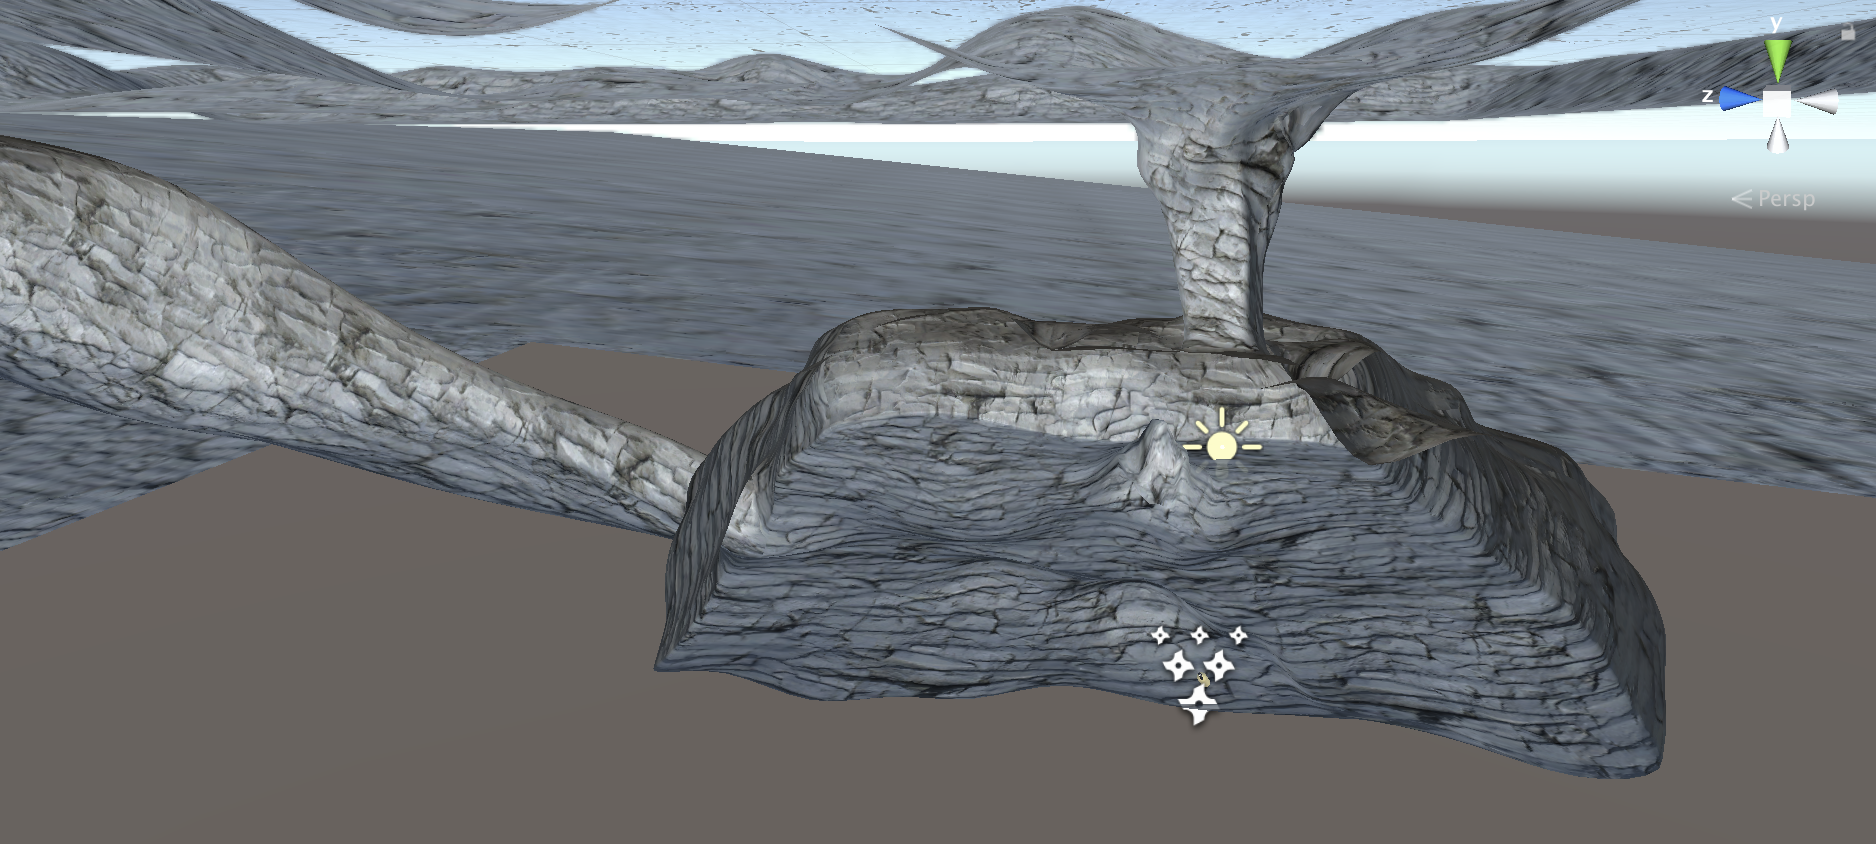
Overall shot of the world. A tunnel from the top is where players initially fall into, the cave below is the main environment to be explored to find objects. Another tunnel leads outward for the final escape to the surface.
I played around creating assets in Blender, attempting 3D modeling for the first time. Ultimately, my coral didn’t make it into the final piece, but it was a good exercise for me.

Coral inspiration.

Rendered 3D coral model

SOUND DESIGN
I felt sound was crucial to the underwater ambiance for our project, so I took the lead on creating a narrative soundscape. I thought about how to make it most realistic, selected the sound clips, and mapped out where to place them in the story (for example what sounds are continuous vs. which are triggered by events), as well as how to apply them in the Unity code. Sound became an extremely useful device to create cues to players about what was happening as well as instilling emotion, like for a win versus a loss.

Pseudo code for sound placement.
Version 3: For our final Unity version, play through streamlined, all assets were in place (such as a real light source), on-screen text prompts were added, and the sound design was implemented.